The waterproof coating that encircles the house and closely adjoins the basement is an important component of a residential building. It is customary to think about the device of a protective structure, which simultaneously performs a decorative function, at the design stage. Therefore, the owner can only choose the type of finishing material. Most often, it becomes a pavement made of paving slabs, which looks elegant, delicately playing with the landscape and design of the area.
The content of the article:
-
What is the blind area for - the main functions
- Features of the layered structure
- Why choose paving slabs?
- Preparation of tools and materials
-
Step-by-step instruction
- How to put on the sand with your own hands
- How to lay on the solution with your own hands
- What nuances need to be taken into account
- Common Mistakes
What is the blind area for - the main functions
The blind area is a complex structural element, the main purpose of which is to protect the basement of the building from moisture that can penetrate inside from the external environment. At the same time, this design performs a number of other equally important functions:
- Improves the temperature regime in the basement, since the puff "pie" includes heat-insulating material.
- Protects the foundation from waterlogging, increasing the life of a residential building.
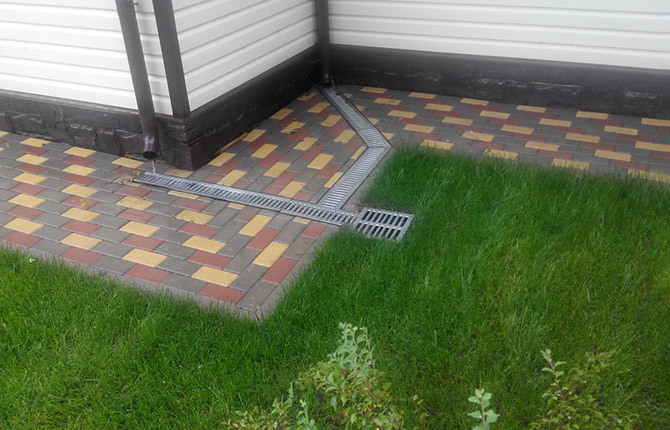
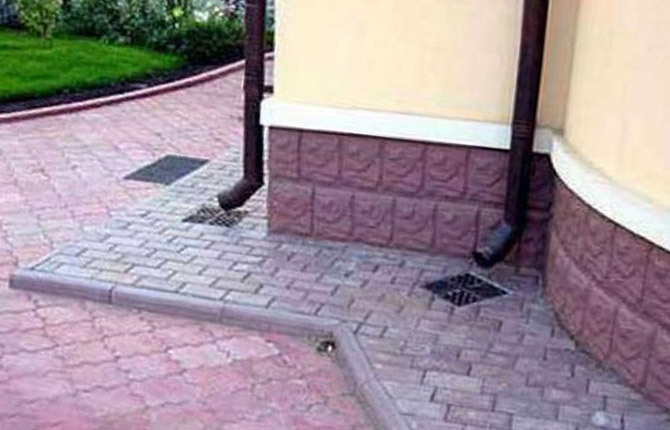
- Provides drainage of storm or melt water into the sewer system.
- Prevents the destruction of the foundation, especially in winter due to heaving of the soil due to its freezing.
- Replaces the footpath, providing unhindered movement along the walls of the house and facilitating the cleaning of the local area.
- Enhances the appearance of the building, giving it an attractive appearance that is in harmony with the surrounding landscape.
Features of the layered structure
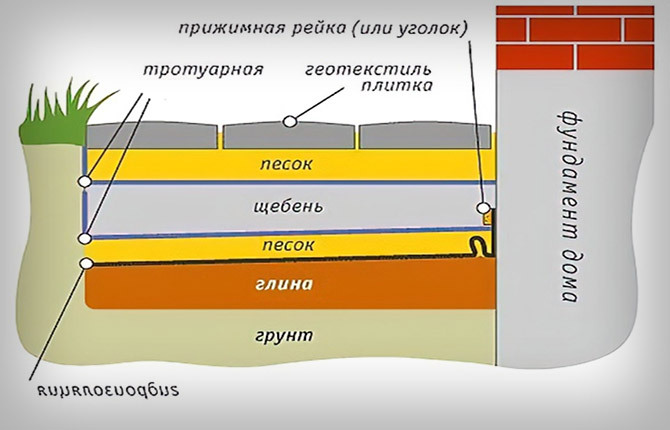
The structural advantages of the blind area from paving slabs are the construction of a "pie", which consists of the following components:
- Dense base - the compacted bottom of the trench, made of clay, sand or a mixture of these materials.
- Pillow - drainage from any non-metallic bulk material. Pebbles, gravel, gravel of medium or fine fraction, coarse sand are suitable.
- Waterproofing - a waterproof separator made of geomembrane, polymer film.
- Insulation is a heat-insulating layer that prevents freezing of the soil, its heaving in the immediate vicinity of the basement structure of the house.
- Decorative finishing - paving slabs, curb stone, elements of the drainage system. Installation is carried out on a cement-sand mixture or concrete mortar.
Why choose paving slabs?
When choosing a material for decorative finishing, blind areas around the house most often imply common paving elements: clinker, natural or artificial stone, paving slabs. The latter is valued for the fact that it has the shape of not only a bar, but also a more complex geometry.
As practice shows, performance does not depend on the type of element chosen for the decorative finish of the blind area, but on the material used for its production.
| Variety of decorative material | Description |
| stone paving |
One of the oldest types of paving in modern design is rocks of increased hardness: basalt or granite. They are used for the construction of paths with high traffic or blind areas, if there is no organized drain. For finishing the blind area, a stone with a sawn, polished, less often chipped surface is usually used. However, the most popular material is considered to be granite, which has an attractive texture and a wide color palette. |
| Clinker |
Artificial stone, the material of which are special varieties of refractory clay. After the formation of the bars, they are fired at a temperature of up to 1580 ° C, obtaining ready-made clinker paving stones, which are not inferior in hardness to granite. Clinker for decorating the blind area is used extremely rarely. This is due to the high cost of the material, as well as the limited choice of colors: from yellow to dark brown. |
| Concrete paving slabs |
For decorative finishing of the blind area, two types of paving slabs are used: vibrocast and vibropressed. The first is made from a mixture of cement and sand with the addition of a coloring pigment, which makes the surface of the tile bright and smooth. In a decorative sense, this is the most attractive element for a blind area. But if the roof does not have an organized drain, the material will rapidly collapse due to its low strength. The second type of paving slabs is more durable - vibropressed. Due to the muted shades of color and simple geometric shapes, it is inferior to vibrocast paving slabs, but it has low water absorption and endurance of negative temperatures. In addition, it has a rough surface, but this is rather an advantage, especially in icing conditions. |
Useful: How to make a blind area around the house with your own hands
Preparation of tools and materials
To make a blind area from a tile, you will need to prepare:
- plain gray or colored paving slabs;
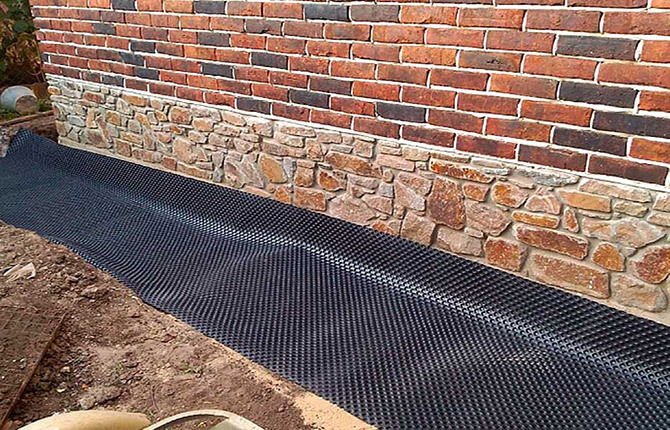
- waterproofing profiled material or high density PVC film;
- geotextile;
- curb stone;
- clay ordinary ground;
- cement grade not lower than M300;
- fine-grained crushed stone (gravel);
- river or quarry sand;
- collectors and other elements for the construction of drains.

If the work will be carried out independently without the involvement of the installation team, you will need the following set of tools:
- 5-meter metal tape measure for taking measurements;
- pegs and nylon cord for marking;
- construction level;
- shovels - bayonet and shovel;
- mallet - a rubber or wooden mallet for leveling the laid paving slabs;
- Master OK;
- vibropress;
- containers for mixing the solution;
- grinder with diamond discs for trimming decorative stone.
Step-by-step instruction
After the completion of the preparatory stage, they invite craftsmen or start building a protective strip on their own. Since the blind area with paving slabs belongs to soft-type structures, a high-quality base is required for its installation.
Taking into account the characteristics of the soil, the size of the paving slabs, the thickness of each layer of the "pie" can be changed, but it is not recommended to completely exclude it.
How to put on the sand with your own hands
So that the blind area of paving slabs not only ennobles the house and the adjacent area, but also served as a reliable defense, its construction should begin after careful preparation of the so-called lodge. In this case, the coating will lie for a long time, will not crack, will not sag or swell.
Building the Foundation
The construction of a protective strip around the house begins with the digging of a trench. If there is an old blind area, it is removed, and the place is carefully cleaned. For a new “pie”, a layer of soil is removed. If it is planned to install a drainage system, provide a recess for laying drainage trays, pipes at a sufficient distance from the walls of the basement. Instructions for creating the base:
- Since the width of the bed should be at least 60 cm, the required distance is measured from the foundation walls, another 5 cm is added (for mounting the curb stone), after which the wedges are driven in and the cord is fixed. The outlined area will be the place of the new blind area.
- Next, a layer of soil is removed, the resulting ditch 40-50 cm deep is thoroughly cleaned, the bottom is leveled, while forming a slope of 2-3 ° to the outer edge of the future strip.
- Next, a layer of soft, homogeneous, moistened clay is backfilled, constructing a clay "hydraulic lock". It will serve as a water seal, preventing the penetration of moisture to the walls of the basement.
- After waiting for the complete drying of the clay, a waterproofing profiled material or a plastic film is laid. Sand is poured on top, 5 cm high, and after thorough compaction, a 10 cm layer of gravel.
- At the next stage, a curb stone is laid, but with the use of DSP - a cement-sand mixture, which provides high structural strength. Before installation, install the required number of drainage trays so that the side of the drainage gutter is flush with the paving slabs. The cracks are sealed with mortar.
- After the formation of the curb, another layer of geotextile is laid on the crushed stone drainage cushion, making sure that the canvas completely covers the space from the wall to the edge of the blind area. The edges of the material are wrapped outward, one is smeared with bituminous sealant and attached to the foundation wall with metal strips. The other edge is hidden in a slot on the inside of the curb. All gaps, even small ones, are covered with sand.
Installation of paving slabs
Events for decorative finishing of the blind area with paving slabs are always planned to be carried out in dry weather and do it like this:
- On top of the laid sheet of waterproofing material, a backfill is made from the DSP to a height of 2-4 cm. The dry mix is prepared from sand and cement grade M400 (1:5). The pillow is tightly packed, carefully leveled, since paving slabs will need to be laid in a set and without pressure.
- The installation of the bars begins from the side of the base: to align the row, pull the cord. Pre-leave a gap for laying an expansion joint between the foundation and the blind area, which, after completion of work, will be filled with cement mortar.
- Each tile is laid as follows: a small amount of wet mixture is applied to the lower ribs, laid in place, keeping the pattern, and adjusted with a rubber mallet.
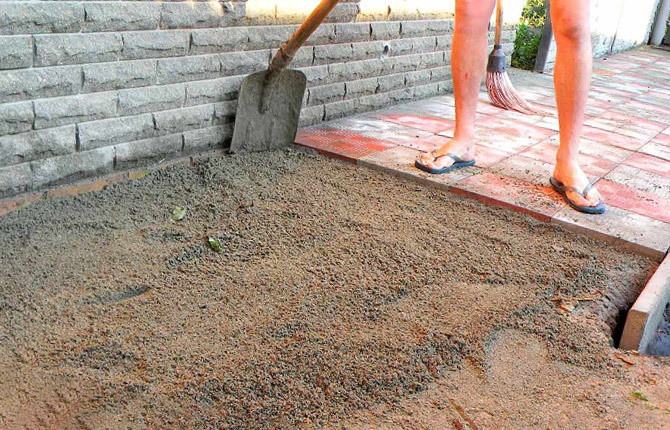
When all the elements of paving slabs are "planted" in place, they begin to seal the seams. To do this, the cracks are covered with a dry cement-sand mixture, but already in a ratio of 3: 1, after which the finished blind area is abundantly watered with water from a garden hose. Under the influence of moisture, the “grout” will become more durable, and the remaining solution will be washed off the surface of the decorative coating.
You can also fill the cracks with quartz sand, which gives the grout strength, stability and an attractive appearance. However, to save money, you can take ordinary, but pre-sifted, quarry sand.
How to lay on the solution with your own hands
Before laying paving slabs on the mortar, as in the previous case, prepare the base:
- For the future blind area, a site is determined, the boundaries are marked with pegs and a nylon cord.
- A layer of soil is taken out, taking into account the slope in the opposite direction from the foundation. Since the top layer of soil is always saturated with organic matter, its subsidence is inevitable. Therefore, the fertile layer is removed completely (to a thickness of 20-40 cm) - it can be used in other areas.
- The bottom of the dug trench is cleaned and rammed, the outer walls are reinforced with formwork.
- Geotextiles are laid on the compacted substrate, which will protect the "pie" from plant germination.
- Then they make backfilling from any non-metallic inert material: sand, gravel or crushed stone. The last two are a reliable cut-off of ground moisture, so they are more expensive. Backfilling is done with a thickness of at least 15 cm, observing the degree of slope and compaction with a vibrating plate to the most dense state.
- This is followed by a layer of cement-sand mixture (in a ratio of 1: 3). Since the solution hardens quickly, it is prepared in small portions.
- Before kneading the above composition, paving slabs are correctly laid out around the perimeter in strict accordance with the selected pattern.
- When everything is prepared, several rows of paving slabs are removed from the base, along its surface distribute the cement-sand mortar (at least 10 cm thick) and only then lay the removed row bars.
After all the paving slabs are laid on the mortar, the joints are grouted with a cement mixture, and preferably with bitumen. Sand is not used for this purpose, since it absorbs moisture well. It is also not recommended to lay tiles on a concrete base.
Healthy: Do-it-yourself insulated blind area around the house.
What nuances need to be taken into account
Having the ability to work with the selected material, having familiarized himself with the technical requirements, even a novice developer can build a pavement from paving slabs. But for the successful implementation of the project, some nuances should be taken into account:
- The angle of inclination of the surface of the blind area from paving slabs, directed in the opposite direction from the foundation, should be 1-10 °.
- The width of the path should be 25-30 cm more than the eaves of the roof, then the water will drain onto its surface, as intended.
- The blind area of paving slabs should form a closed loop around the entire perimeter of the building. Otherwise, moisture will be able to flow to the foundation in places where there is no coating.
- To prevent the penetration of the roots of trees and shrubs deep into the puff "pie" of the pavement from paving slabs, the installation of a curb along the outer edge of the strip will help.
- To prevent flooding during heavy rains, snowmelt or other adverse weather conditions, a blind area of paving slabs is constructed in such a way that the lower outer edge remains elevated above ground level by 5-8 cm.
- To reduce the cost of finishing material, choose a suitable sample of paving slabs and an economical installation method that minimizes residues.
- The thickness of paving slabs is determined taking into account operating conditions. To move people, a relatively thin material is chosen; at high loads, thicker bars are preferred.
Common Mistakes
Choosing the option of how to make a do-it-yourself tile blind area, novice developers, and sometimes inexperienced craftsmen, allow a number inaccuracies or violate the laying technology, as a result of which paving slabs quickly collapse or serve less than expected term.
Main mistakes:
- "Blind area - a little later!". Due to a misunderstanding of the role of the site that borders the building, in protecting the foundation, the construction of the blind area is constantly postponed for later or not done at all. As a result, moisture penetrates into the backfill zone, which leads to soaking of the base of the foundation.
- The absence of the required slope. Moisture will stagnate on the surface of the blind area, destroying paving slabs, or accumulate at the junction with the base of the building.
- Lack of expansion joints between the foundation and the protective strip. Filling the blind area with a single monolithic belt leads to the appearance of cracks on its surface, violation of the integrity of the decorative layer of paving slabs with even slight ground movements. To avoid cracking, the concrete base is separated from the basement walls by expansion gaps.
- Savings on a pillow of pebbles, crushed stone, gravel. Disrupts the drainage layer. The minimum backfill thickness is 100 mm, the recommended one is 150 mm.
- Weakly rammed base. If the soil under the blind area is not compacted tightly enough, it will gradually sag, due to which part of the concrete structure will turn the slope in the opposite direction or crack. The decorative finish of the blind area with paving slabs will also be damaged.
- Insufficient number of gutters for water drainage, lack of drainage trays. It leads to the accumulation of water flows at the lower outer edge of the blind area, which is already considered a problem area due to frequent waterlogging.
The construction of a blind area around the house is available to anyone who seeks to qualitatively protect the foundation of a country house or cottage. The main thing is to be patient, stock up on time, purchase tools and materials, act in accordance with step-by-step instructions.
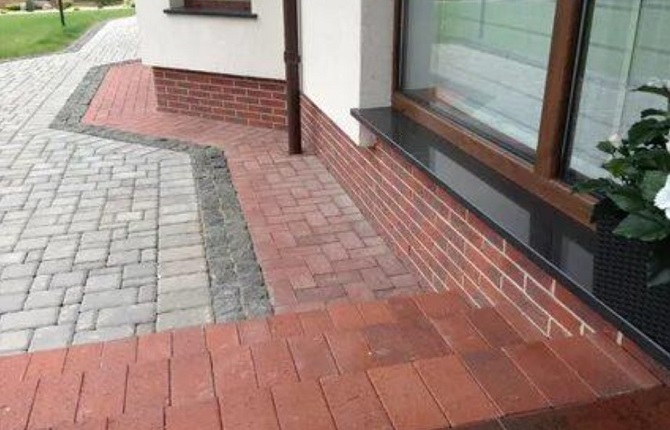
Much more attractive and organic than the dull gray concrete, restrained paving stones or bright paving slabs around the house look. In addition, this decorative finishing material is not inferior in strength and reliability, since it eliminates errors in the preparation of the solution, which subsequently cause cracks.
Related video:
What is the difference between paving slabs and paving stones:
Laying paving slabs on the concrete base of the blind area:
What do you think: is it necessary to finish the blind area with paving slabs or is it better to leave a concrete base? If the article turned out to be useful, add it to your bookmarks, and share the link to it in social networks and on thematic forums. Write in the comments if you have a dacha or a country house and what methods you used to solve the issue of protecting its foundation.