
This article is for those who want to understand the topic of convectors. In it you will learn what a convector is and their principle of operation, what types of convectors exist, the advantages of convectors built into the window sill. Also below will be step-by-step instructions on how to install the convector in the windowsill.
The content of the article
-
Convectors - what is it. How are convectors different from radiators? Principle of operation
- The principle of operation of the convector
- Types of convectors by installation method
- Answering basic questions
- Advantages of convectors built into the window sill
- How to install a convector in a window sill, step by step instructions
Convectors - what is it. How are convectors different from radiators? Principle of operation
Convectors are heating devices used indoors as the main or additional heating system. They look like thin and smooth batteries. They differ from radiators in that radiators heat the air with their surface, while convectors pass air through them, which is constantly moving. Also, they do not have a container with oil, which is why they differ in shape.
The principle of operation of the convector
Their working principle is as follows:
The surface of the convector is heated by a heating element or a heat exchanger. The air in the room constantly circulates due to different temperatures. Cold air from below rises through the convector, where it heats up, after which it goes up, cools down and falls cold. The cycle is repeated.
Advantages of convectors: they quickly heat up the room, do not interfere, and sometimes complement the interior, are compact, can be installed on / in walls, floors, windowsills.
Types of convectors by installation method
You can install convectors in different ways, for example, on the wall like a regular radiator. But why? That's what a radiator is for. The advantage of the convector is that it can be turned over, it is thin and small. Therefore, they are used indoors to comply with the design - built into the surface. The three most common methods are:
- into the wall
- To the floor
- To the window sill
Built into the wall.
The standard way is to make a recess in the wall, and a convector is installed in it. Does not spoil the interior design, quickly heats up the room. In the latter, he is helped by natural convection (air movement due to temperature differences). Typically large and forced convection, they have a fan that draws air in; also available with natural convection. Construction – main body, system/control unit, heating element or hot water.
Embedded in the floor.
Convectors built into the floor resemble a warm floor system. Most often they are built in so as not to spoil the design and because a simple wall-mounted radiator does not fit into the room. Like the previous ones, they are mostly represented by large models with forced convection (a fan for air intake). Structurally, they are no different - housing, control system, heating substance (element / water). The principle of operation has not changed: cold air settles on the floor, it is driven into the convector by a fan, where it heats up and exits through the air outlet.
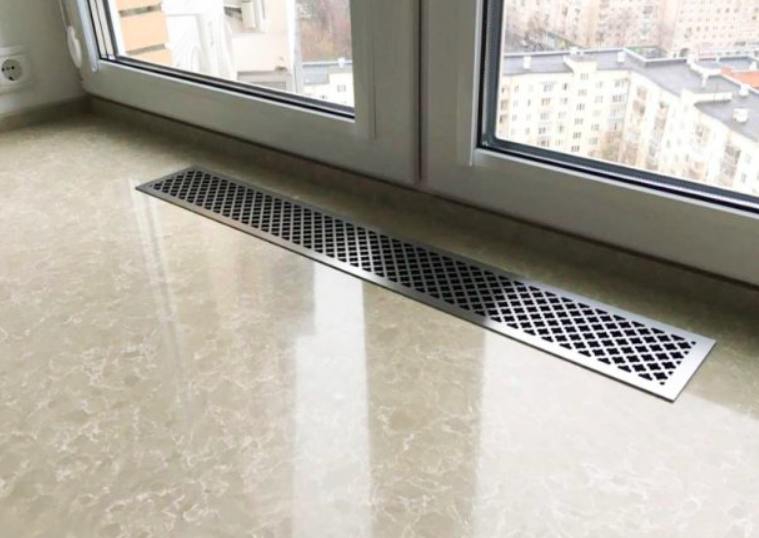
Embedded in the window sill.
Convectors of this type of installation are gaining popularity. Their main advantage is the fight against cold / draft. The air at the window warms up best, so it will not blow from there. They are also placed in rooms with high humidity so that there is no condensation on the windows. These convectors differ from those built into the floor in that they have a moisture removal system; sometimes it is made automatic. Their design is no different.
Answering basic questions
Can convectors be used as the main heating system?
Built into the wall, floor - yes. Built into the window sill - no. The latter are good at fighting condensation on the windows, maintaining the temperature in the room. But because of the way they are installed, there will always be cold air between the center of the room and the window, with the warmest being near the window.
Floor convectors are recommended to be used as an additional source of heat.
Large / small area of \u200b\u200bthe room, which convector to choose?
In rooms with a large area, it is better to install wall, floor convectors. For small rooms, a window sill is also suitable. This is explained by the same cold air between the center and the window. In larger rooms, it will be felt more strongly, plus the center of the room will be colder. In small rooms, the difference is negligible.
Advantages of convectors built into the window sill
- Compactness (efficient use of space, they stand inconspicuously)
- High efficiency
- Consume little
- Convenient to use and care
- Use natural convection (forced models are not popular)
- Maintain moisture levels
- durable
- Dealing with condensation on windows
How to install a convector in a window sill, step by step instructions
Ready-made apartments are rented to buyers already with window sills, which will interfere with the installation of the convector in the window sill, so first remove the window sill. Further:
- Draw the base of the wall - where the convector will stand, its control unit, mounting holes, how the pipes, wires and cable will go.
- Drill holes for the dowels with a drill or puncher (when drilling into concrete, do not forget to add water to the drill and clean dust from the hole).
- Insert dowels. Lead the pipes to the windowsill.
- Connect the pipeline elements to the device body.
- Install the convector in its place on the windowsill. Fix the device with self-tapping screws from the kit.
- Stretch wires, cable. Pair them with the corresponding ones on the device.
- Install the control box.
- Connect the pipeline pipes to the device.
- Check the operation and tightness of the convector and its connections.
- Mount the window sill cover, fix it.
- Treat the joints around the cover with sealant.


