How to level the floor on the balcony. For example, you can make a dry or wet screed or use a self-leveling compound. The specific choice depends on the nature of the rough surface. More details about the production of the base and the technology of laying the screed are described in this article.
The content of the article
- Materials and tools
- Determining the level of the finished floor
-
Formation of cement-sand screed
- Wet screed
- Dry screed
- Self leveling compound
Materials and tools
The main way to fill the floor on the balcony is associated with the laying of a cement-sand screed. For this, the following tools and materials are presented:
- the actual composition for the screed;
- trowel;
- roulette;
- building level (preferably laser);
- construction pencil;
- Sander;
- damper tape;
- beacons and self-tapping screws for their fixation;
- fishing line or construction cord.
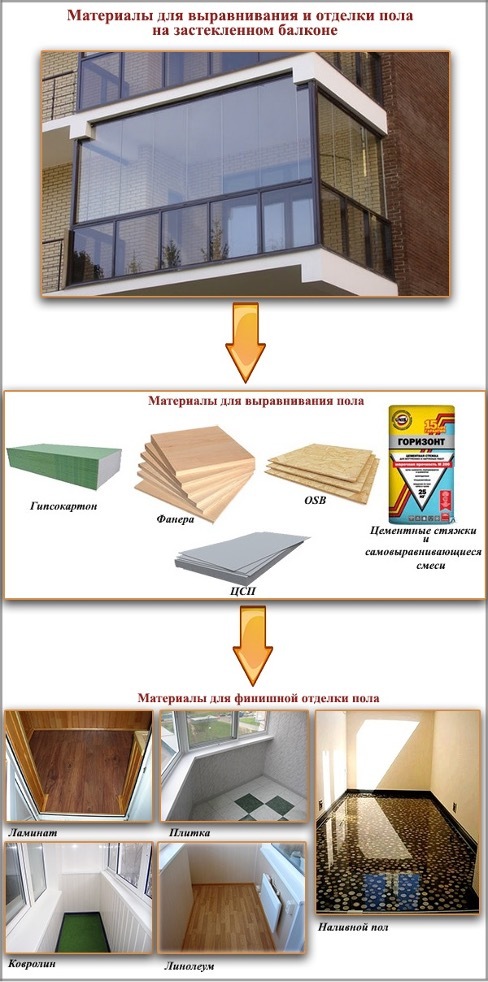
How to fill the floor on the balcony with your own hands. For example, you can use plywood, OSB, DSP, drywall. Finishing materials are also often found. Here, too, there is a fairly wide selection. It depends on how the floor screed was made on the balcony. For example, if plywood, cement and sand screed, or drywall are used, the following options are suitable:
- linoleum;
- carpet;
- tile;
- laminate;
- bulk floor.
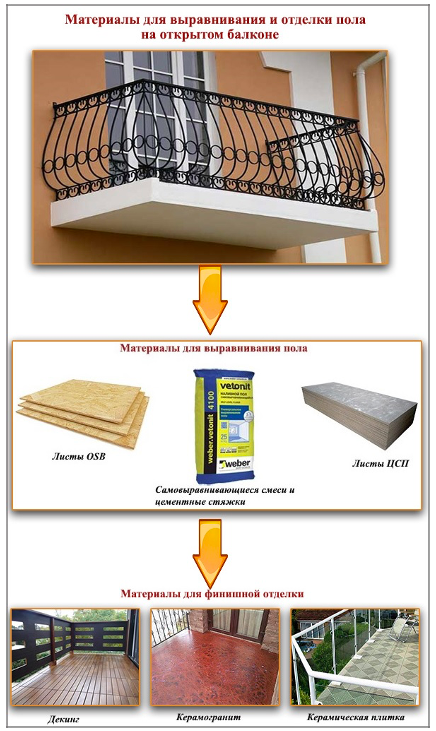
If the floor on the balcony was filled with a screed or OSB sheets, DSP, decking, ceramic tiles or porcelain stoneware can be considered.
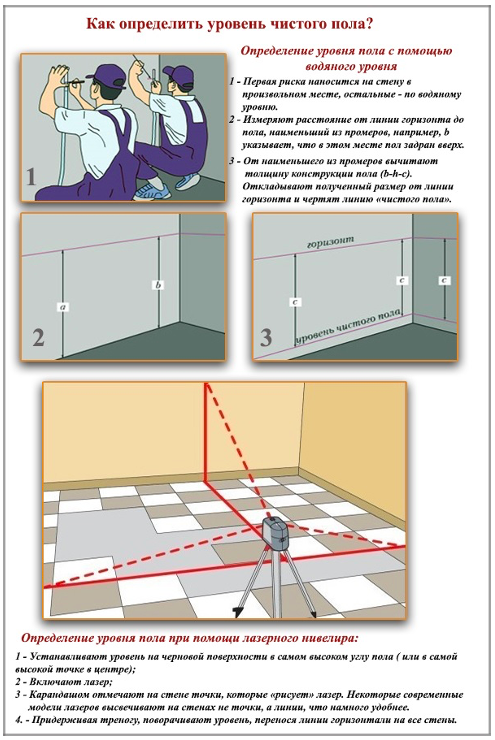
Determining the level of the finished floor
It is very important to decide how to fill the floor on the balcony. But first of all, you should accurately find out the level of the clean floor. To do this, use the building level (water level) according to the following instructions:
- Mark the danger on the wall anywhere.
- Further, at the same level, calculations are made on all other walls.
- Connect the dots with a horizontal line.
- Measure the propagation from the floor to this line at the frequency of occurrence (shortest distance).
- Focusing on this point, with the help of a spirit level, the level of cleanliness of the floor is noted.
Filling the floor on the balcony with your own hands will turn out more accurately if you use not a water level, but a laser level. It is installed in the highest corner on the balcony and turned on. The horizontal will be built automatically - it is along it that you can navigate during the formation of the screed.
Formation of cement-sand screed
The main leveling technology is a screed on the balcony under tiles or other coatings. Moreover, there are 2 methods - wet and dry.
Wet screed
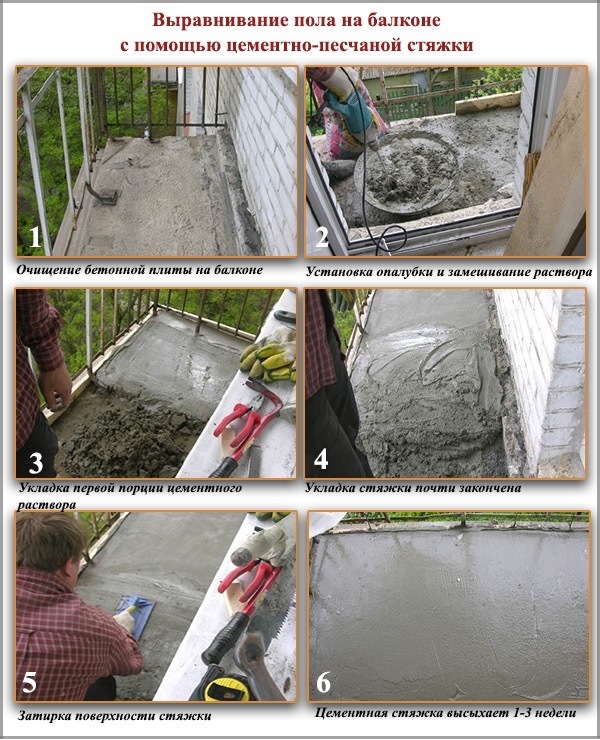
Instructions for forming a wet screed are as follows:
- Before pouring the floor on the balcony, a damper tape is attached around the entire perimeter for marking. 2 lines of passage of beacons are determined with an interval of 10 cm from the walls.
- Prepare the screed solution according to the instructions. Or they mix it themselves from sand and cement M400 3: 1 with the addition of fiber based on a ratio of 900 g per 1 m3.
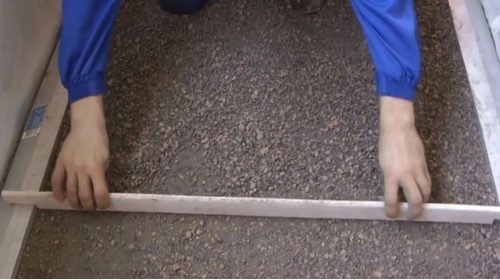
- Along the lines of the beacons, every 50 cm mounds are formed from the prepared mixture. Each beacon is carefully fixed with a slide of mortar so that the mixture completely covers it.
- Next, you need to understand how to make a screed on the balcony. To do this, the solution is poured between the lines of beacons, starting to move from the far wall towards the balcony door. In this case, the solution should completely block the beacons.
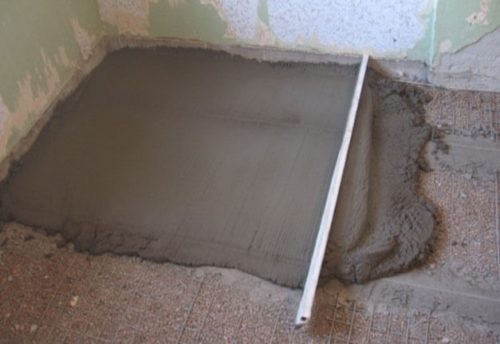
- After pouring each square meter (can be measured visually), the surface is leveled using the rule. Previously, air bubbles are removed from the solution by walking over it with a trowel. And you should strive to ensure that there are as many punctures as possible.
- The mixture is again added to the emerging voids and leveled again. Do this until the surface is as smooth as possible. When they reach the door, a screed is made on the loggia from the other wall in the same way.
- When the mixture sets, the beacons are removed, the solution is again poured into the voids formed. It also happens that the screed shrinks as it hardens (if there was no fiber in the composition). To fix this, you need to additionally fill in the self-leveling compound.
- Then you need to wait a few days and start finishing. If you plan to lay tiles, you must wait 7-8 days, if the laminate - 10-12. Moreover, it will be possible to put heavy objects, furniture only a month after finishing.
Dry screed
A dry screed on the balcony is a simpler option, because in this case you do not need to prepare a solution and, accordingly, wait until it dries. The sequence of actions is as follows:
- The preparatory stage is exactly the same - they mark the level of the clean floor, make markings and put up beacons.
- Expanded clay gravel is poured - it should be a large or medium fraction.
- Since the floor screed on the balcony is done by hand, the layer is also rammed independently. To do this, use a board with a handle like a hand tamper.
- Expanded clay is added and leveled with a rule. And you need to move in the direction from the door. It is impossible to walk on the layer - sheets of drywall are laid on top of it to move.
- The beacons are removed and expanded clay is added to the traces of the metal profile, then leveled again using the rule.
- Lay the flooring in 2 rows so that their connecting seams do not match. The rows are fastened with self-tapping screws at intervals of 20-25 cm.
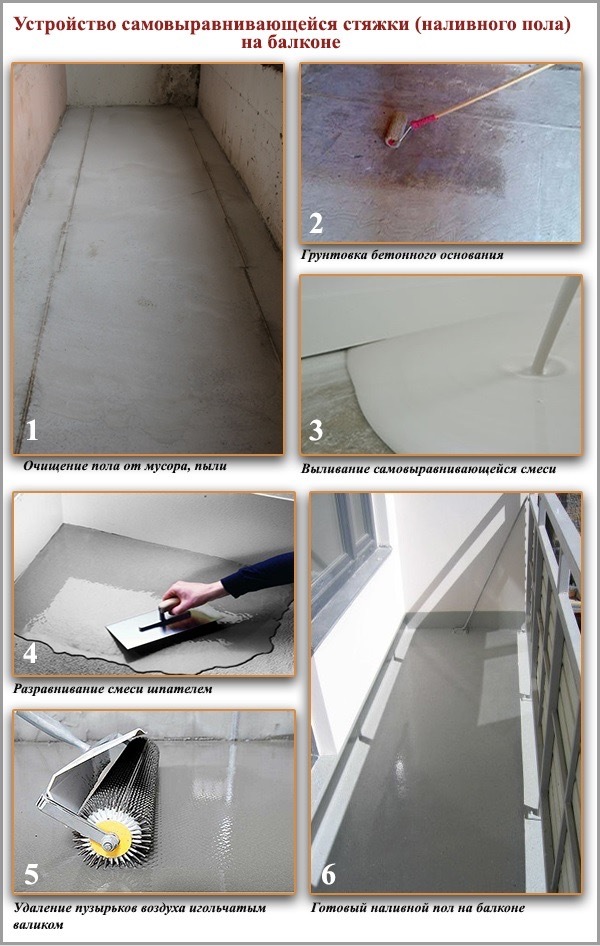
Self leveling compound
Filling the floor on the balcony with your own hands is also carried out using a self-leveling mixture. This option is acceptable if there are small irregularities on the subfloor (differences within 30 mm). In this case, it is undesirable to use cement mortar, because it can crack, and besides, it will not be easy to level it.
Therefore, you can purchase a self-leveling mixture and lay it with a thickness of 3-30 mm. To work along with it, you will need a primer and standard tools (roller, spatula). You also need a special needle roller, which is needed to remove air bubbles through punctures, and a construction mixer. Do-it-yourself screed on the balcony is carried out in several stages, shown in the diagram.
Filling the balcony slab is quite possible to do it yourself. To do this, you need to prepare the surface, make markings and determine the possibilities. the mixture of the entire screed is formed by wet technology or self-leveling mixtures are used.