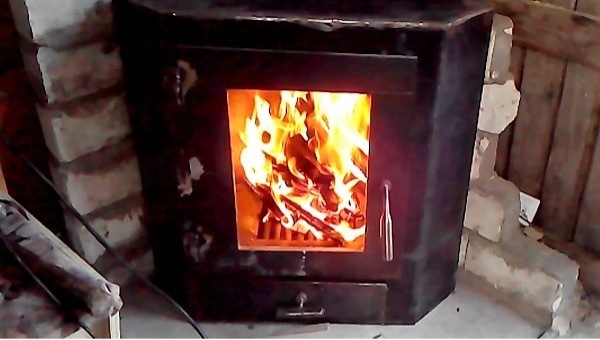
A do-it-yourself iron fireplace is the most practical type of firebox that you can actually assemble on your own in just a day. To make it neat and safe, you need to make a drawing and consider the location of the structure. How to do this is described in detail in the presented article.
The content of the article
- Location options and drawings
- Materials and tools
- Step-by-step instruction
- How to make a chimney
Location options and drawings
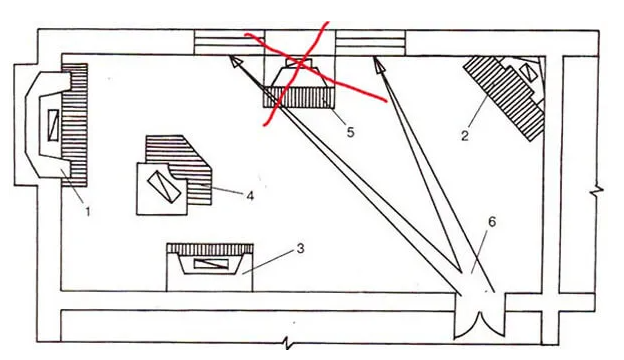
You can make a metal fireplace with your own hands, but first of all, you need to decide on its location in the room. There are no strict requirements, but safety and aesthetic considerations must be taken into account. Several accommodation options are possible:
- The built-in design of the fireplace in the outer wall is the most difficult way. As a rule, it is implemented even during the construction of the house.
- A wall-mounted stove (at a short distance from the wall) is a very convenient location: the fireplace looks aesthetically pleasing, and there is also less risk that it will fall due to accidental contact.
- Corner is a practical way to use unused space. Due to the large area, you can even make a fairly large stove-fireplace with your own hands from metal.
- Standing alone, for example, in the middle of the room is the rarest case. The disadvantages are associated with the risk of falling, besides, the stretching pipe will look ugly. But if you make a special column or a false panel, the design will turn out to be quite attractive and even allow you to zone the space. Appropriate in large rooms - halls, living rooms.
- Location close to the wall - this option should not be considered, because the surface will be covered with soot. If the walls are wooden, there is a serious risk of fire. In addition, when the oven is close, it will be more difficult to care for it.
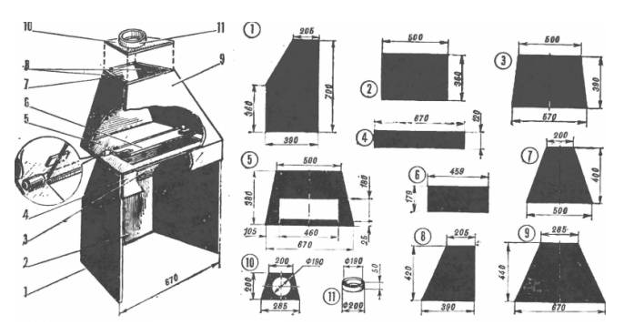
After choosing a place, you need to decide on the size - a metal stove-fireplace with your own hands should fit well into space, that is, approximately correspond to its dimensions with the area rooms. You can take several drawings as a basis and draw up your own scheme, proportionally increasing or decreasing the length, width and height.


Materials and tools
An iron fireplace is made from metal sheets. Moreover, thin sheets (0.5-1 mm) are taken for the ash pan, and thick sheets (3-5 mm) are taken for the main structure. You will also need the following materials and tools:
- welding machine;
- Screwdriver Set;
- Bulgarian;
- heat-resistant sealant;
- a set of brackets for fasteners;
- chimney pipe (minimum diameter 20 cm);
- elbow for connecting pipe fragments (if you need to make turns);
- metal corners;
- head fungus;
- hinged door;
- metal slats for legs (minimum diameter 5 cm);
- cement slab, bricks or dense sheets of chipboard (pedestal);
- basalt wool;
- roulette construction;
- grate.
A do-it-yourself fireplace insert made of metal is assembled in several stages, and you need to start not from the stove, but from the pedestal. After that, iron sheets of appropriate dimensions are cut and a fuel compartment is formed. At the last stage, the chimney is assembled.
Step-by-step instruction
It is not difficult to assemble a metal fireplace with your own hands - the main thing is to draw up a drawing correctly and follow it exactly at every stage. The ability to use a welding machine is also important. The step by step guide looks like this:
- In most cases, the stove is placed next to a wall or in a corner. Since the surfaces are very hot, thermal insulation (for example, basalt wool) is placed on the floor first.
- Install a pedestal from chipboard sheets. A ceramic or fiber cement slab is placed on top of it to ensure fire safety.
- A do-it-yourself steel fireplace poses a danger to walls that are made of combustible materials, including finishing materials (drywall, wallpaper). Therefore, the surface is pre-protected with refractory brickwork. You can also put ceramic tiles or artificial stone - then the wall will look especially beautiful.
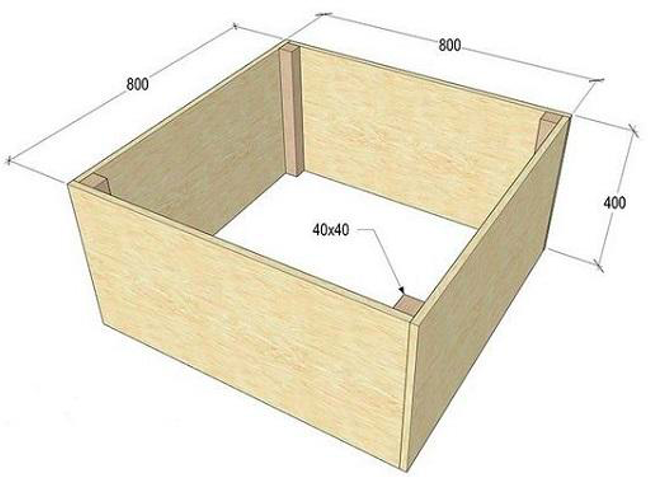
- Next, they take drawings of a fireplace made of metal with their own hands and proceed to assembly. Sheets are cut, side panels are welded, and to them - the walls at the back and front. Previously, a hole is cut in the latter. They also do it below to shed ash.
- Sometimes they make a fireplace from a large diameter pipe with their own hands, if it is suitable in thickness. But the design of their flat sheets is simpler, since it allows you to choose any size. To create the bottom, a thick metal sheet is taken and the legs are attached from below. They should be of a small height within 12 cm and a large thickness of at least 5 cm.
- By welding, a thick sheet is attached along with the legs to the side surfaces - this will be the bottom of the stove.
- A do-it-yourself fireplace insert made of metal according to the drawings is already ready - it remains only to make partitions inside the main furnace and ash pan. The firebox itself should be two-layer, so another similar smaller structure is formed inside the chamber. This creates an air gap that prevents the surfaces from getting too hot.
- Do-it-yourself iron fireplace, as shown in the drawings and photos, must have a grate. You can simply buy it or make it yourself using reinforcing bars.
- Now you need to weld the hinges to the structure in order to hang the door. From the bottom of the combustion chamber (10-12 cm), metal corners are welded to hold the grate.
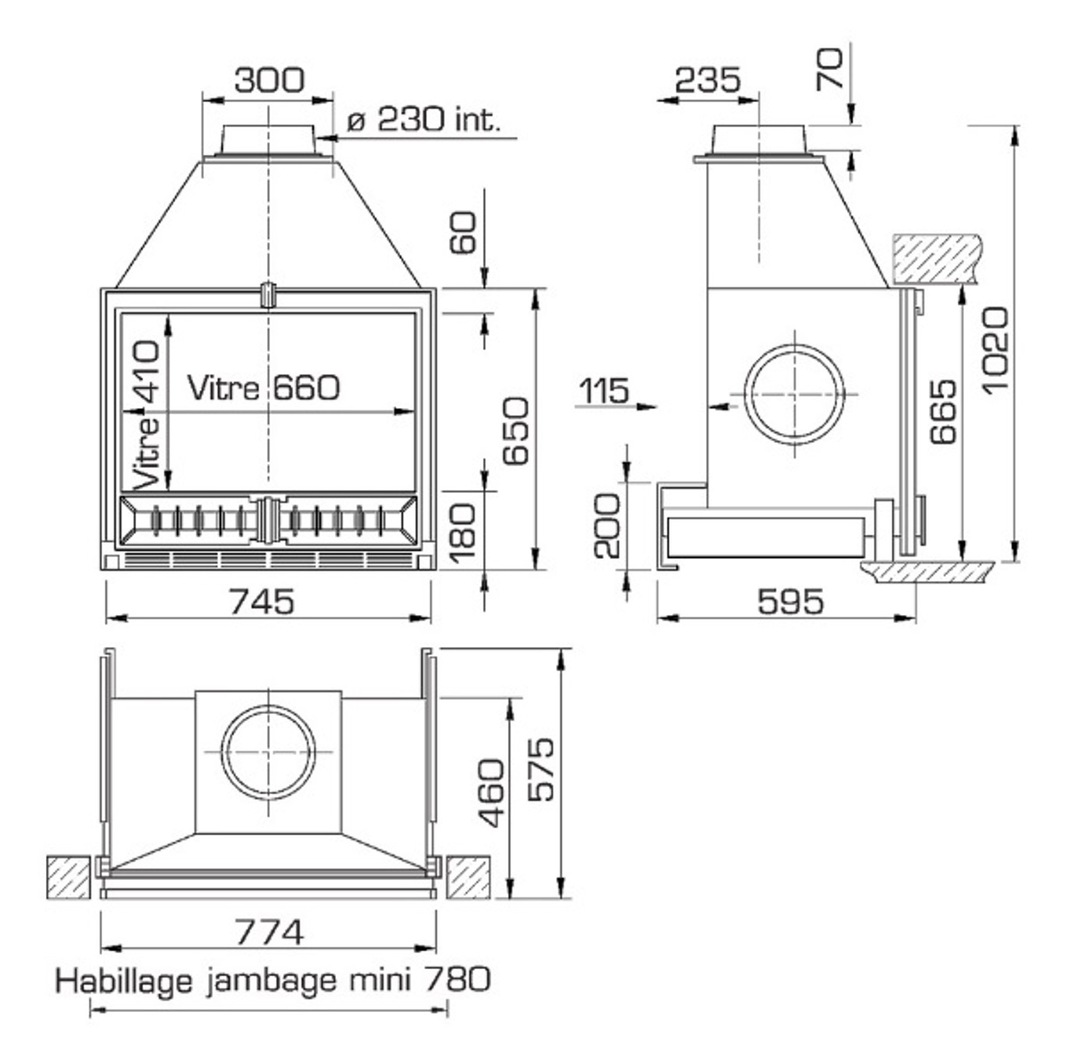
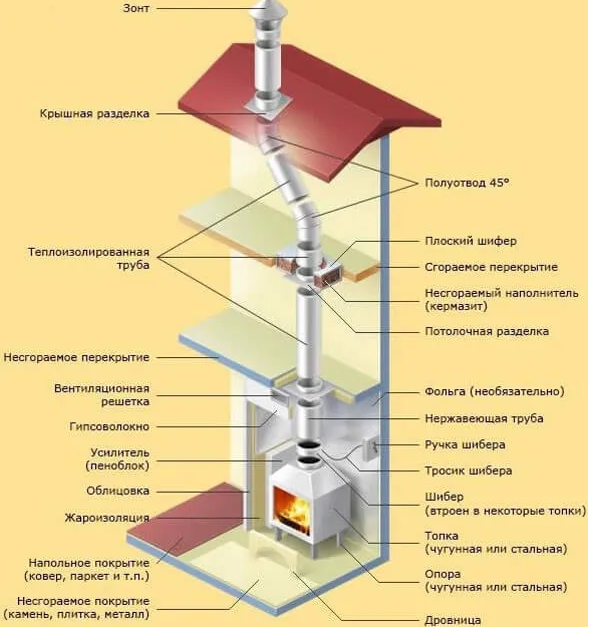
- Regardless of how the structure is made - a fireplace from a large diameter pipe or from ordinary iron sheets - it needs a chimney. From above, the firebox is closed with a lid with a pre-made hole corresponding to the diameter of the pipe.
How to make a chimney
The final stage of work is the creation of a chimney, which is led through a wall or roof directly to the street. The design can be straight, but more often consists of 2-3 knees in the form of a zigzag. A do-it-yourself iron fireplace is made in such a way as to insert a pipe into a prepared hole in the lid. At the junctions of adjacent fragments, they are treated with a heat-resistant sealant. For this, as a rule, basalt wool is used.
The chimney is raised to the roof to a height of at least 50 cm from the ridge. A head with a fungus is attached to the pipe so that precipitation and dust do not get inside. The result is a one-piece construction - a do-it-yourself iron fireplace looks like this schematically.
Then you need to perform a test firebox with any firewood to check the tightness of the structure, how the panels heat up, if there are any foreign smells, how stable the firebox is. Caring for the stove is not very difficult - ash is removed from the ash pan 1-2 times a month, and the inner surfaces of the furnace are cleaned of soot deposits. As for the chimney, you need to clean it at least once a year.
An assembled metal stove made of metal with your own hands according to the drawings can not only decorate the room, but also become an additional source of heat. All work can be done independently, choosing the right materials and step by step following a pre-compiled scheme.