A live Christmas tree creates a special atmosphere for the New Year holidays, but it also brings a lot of trouble. After all, the tree needs to be placed on a solid foundation so that it does not collapse in the midst of fun. A Christmas tree stand, which you can buy in a store or make with your own hands, will help with this.
And in order to decorate the space under the winter beauty, make the composition holistic, effective and incredibly beautiful, you should show your own creativity or use ready-made original ideas.
The content of the article:
-
What can a stand be made from?
- Making from wood
- How to make from metal
-
Design options
- In the form of a base covered with fabric
- In the form of a fabric bag
- In the form of a wooden box
- In the form of a “skirt” for the Christmas tree
What can a stand be made from?
Artificial Christmas trees that are popular today are sold with a ready-made stand. However, a living tree will need a solid base, which you can buy in a store or make a stand at home. The following materials are suitable for this: cardboard, wood, plastic bottles, metal or PVC pipes.
The metal base is the most reliable and durable, but is considered quite difficult to manufacture. To assemble the stand, you need to have skills in working with certain tools and devices, for example, a hacksaw, a grinder, or a welding machine.
Making from wood
There are many options for making a tree stand for a Christmas tree. The ideal material is natural wood, especially a sheet of moisture-resistant plywood. It is affordable and has an optimal thickness of 20 mm. When choosing this material, it is worth considering the dimensions of the tree itself - a live Christmas tree should be small and relatively light.
For heavier trees, it is better to choose stronger wood: boards or timber. Working with this material is much harder, but only such a stand can support the weight of the tree without the risk of overturning at the most inopportune moment.
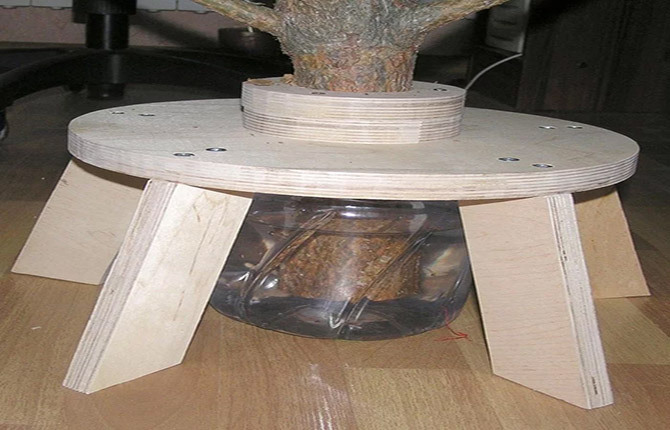
When planning to make a stand, you should increase the height of the legs so that a container of water can fit into the resulting gap, where the barrel will be inserted. Otherwise, under the influence of heat, the forest beauty will begin to quickly shed its fragrant needles.
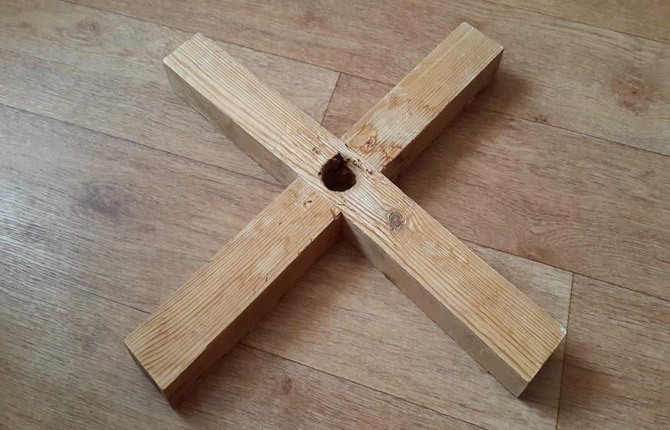
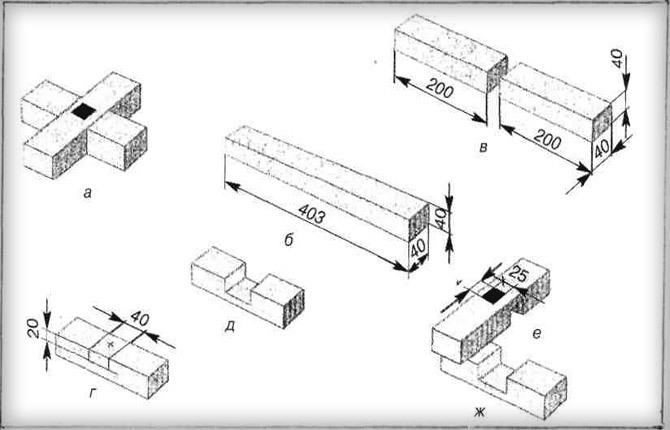
Artificial Christmas trees are much lighter than their living counterparts, and they also come with ready-made stands. However, as an option, you can make a regular cross from wood, which does not require the installation of a container with water. For this model, two identical blanks are selected, a groove is cut out in the lower one, into which the upper part is inserted. The structure is fixed with self-tapping screws, a hole is drilled in the center where the barrel will be inserted. Small stable legs are nailed to both blanks.
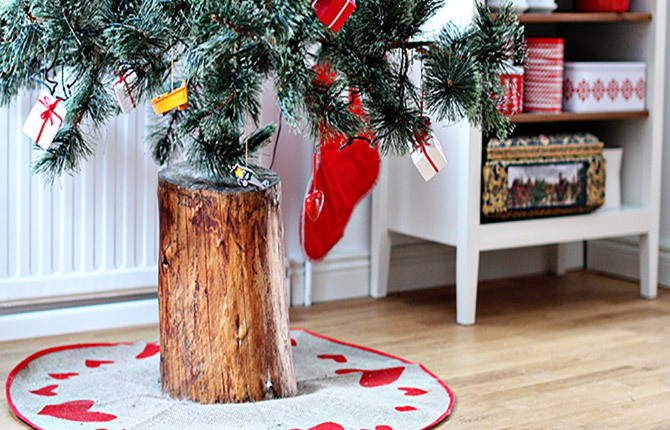
In some cases, the Christmas tree stand is made from ordinary logs. To do this, saw off a fragment of the trunk of the required height. One side will serve as a base, the second with a pre-drilled hole will serve as a mounting location for the tree.
Tools and materials
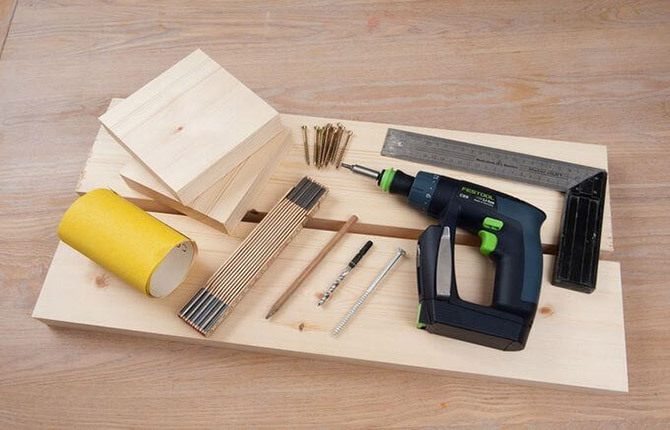
To make a wooden cross-type stand, you will need the following components and equipment:
- wooden board 5-7 cm wide or timber with a cross-sectional side of 40 mm;
- self-tapping screws, the length of which depends on the thickness of the material used;
- pencil or marker;
- construction tape;
- jigsaw or wood saw;
- drill or screwdriver;
- crown attachment.
Sketch
To make the Christmas tree stand stable, you need to develop it yourself or find a ready-made drawing. As a basis, it is better to take a sketch called “Wooden Sacrum”, since most wooden models are created using this technology.
Step by step diagram
Having analyzed the drawing sketch, we proceed directly to creating a wooden stand for the Christmas tree.
- Markings are made on a board or beam with a pencil or marker. If the tree is tall, it is better to choose thicker material.
- Use a hacksaw or jigsaw to cut 2 identical pieces.
- A groove equal to the width of the board or beam is cut out on the part that should be located below.
- A second workpiece is inserted into the resulting gap - it should fit firmly into the groove and not wobble.
- Place a crown attachment on the drill and use it to drill a hole in the center of the cross.
- Both parts are fixed with self-tapping screws.
To prevent the “legs” of the finished stand from appearing too long and interfering with having fun near the Christmas tree, it is recommended to cut the ends of each at an angle of 45° and round the edges.
How to make from metal
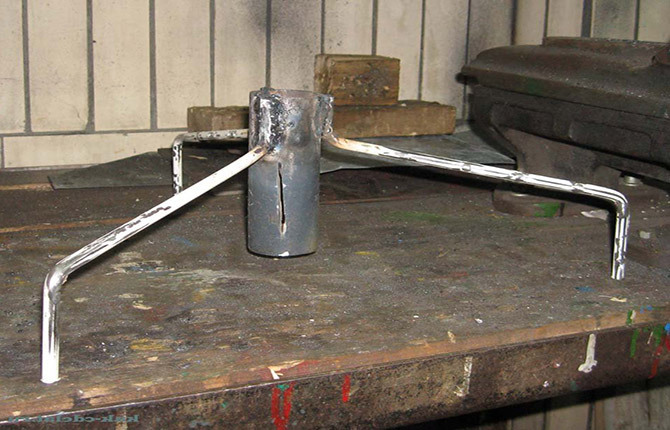
Having the skills to work with welding equipment and having a number of necessary tools at hand, you can make a stand with your own hands from metal. This design is considered durable and can last for several years.
What you will need:
- a piece of pipe suitable in internal cross-section to the diameter of the trunk at the base;
- a soft metal rod with a diameter of no more than 12 mm;
- construction corner;
- hammer;
- welding machine;
- Bulgarian;
- primer for corrosion protection;
- metal paint of the desired shade.
Metal stand manufacturing process:
- A fragment of the required length is separated from the common pipe.
- At the same time, prepare 3 pieces of rod for the legs. After sawing off the desired fragment, two shoulders are made. Bend the rod at an angle of 90°.
- For the structure to be stable, the length of each leg must be at least 160 mm. Of this, 18 mm goes to the short section that will be welded, and 54 mm to the lower elbow.
- The joints are marked on the base pipe, after which the legs are welded, observing safety precautions.
- The finished stand is primed with a special anti-corrosion compound, and after drying it is painted in the desired color.
Design options
The Christmas tree stand is made from different materials, but to make the composition complete, it is necessary to disguise the base. The decor is planned taking into account the type of New Year tree (live or artificial tree), interior design style, as well as the allocated budget.
The simplest option is to imitate a snowdrift. To do this, take a white cloth, cover the stand with it along with the Christmas tree, and line the inside with cotton wool or padding polyester for volume. Decorate the structure with shiny tinsel.
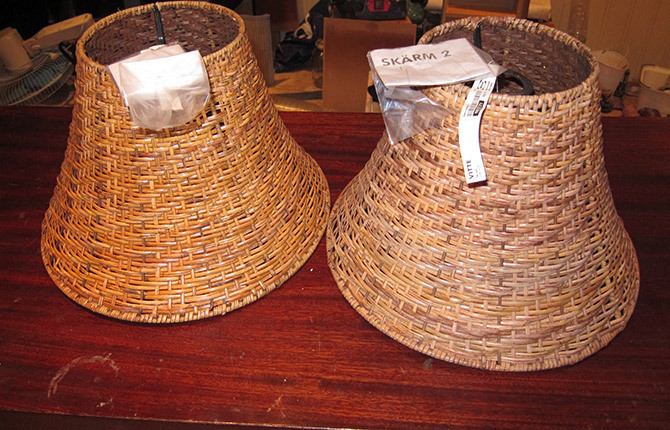
Another simple option is a wicker rattan basket. The finished product can be easily replaced with a homemade analogue. To do this, a cardboard box is usually used as a base, and polyrattan, jute, rope, cord or newspaper wicker are used for weaving. To imitate snowdrifts, the basket is filled with padding polyester and artificial snow is sprinkled on top.
A few more original ideas on how to decorate Christmas tree stands with your own hands, with visual photos and detailed descriptions, are presented below.
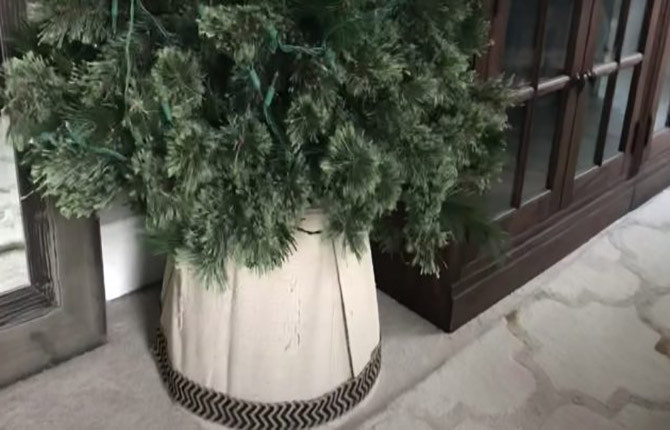
In the form of a base covered with fabric
A very simple, but at the same time original option for decorating a Christmas tree stand. You need to choose a laundry basket that fits the size, choose an elegant fabric and cover the container with it.
What you will need:
- round plastic laundry basket;
- a piece of fabric or burlap;
- decorative tape - 1.5-2 m;
- hot melt adhesive rods;
- scissors;
- breadboard knife;
- gun for gluing parts;
- thin rope, twine or elastic band.
Manufacturing process:
- Using a breadboard knife, cut out the bottom of the basket. The frame is covered with fabric, the edges are fixed with hot glue.
- Decorative tape is glued along the edges of the base and the wide part of the basket.
- The finished accessory is placed on a stand, and then the tree trunk is fixed.
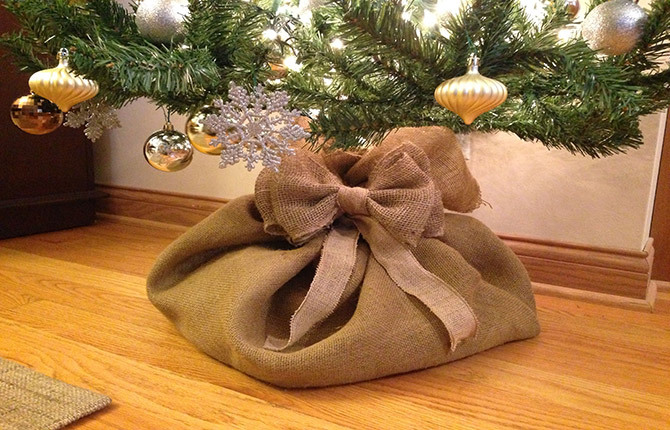
In the form of a fabric bag
A stand for a Christmas tree installed in a country house or country house can be draped with burlap or other suitable fabric. Elegant, inexpensive material can certainly be found in any household.
What you will need:
- a piece of fabric or burlap measuring 150 x 150 cm;
- thick corrugated cardboard;
- marker;
- scissors;
- several plastic bags;
- thin rope, elastic band, or twine to secure the structure.
Manufacturing process:
- The Christmas tree stand is placed on a sheet of cardboard, the protruding points are marked and connected. The resulting base is cut out with scissors.
- The prepared fabric is placed face down on the floor.
- A cardboard base is placed in the center, and then a stand with a Christmas tree attached to it is installed. Cellophane bags are placed around the stand to create volume.
- Next, the edges of the fabric are lifted and connected at the base of the tree trunk, holding them with one hand.
- The other is securely fixed with a rope, twine or elastic band with one hand to create a voluminous elegant bag.
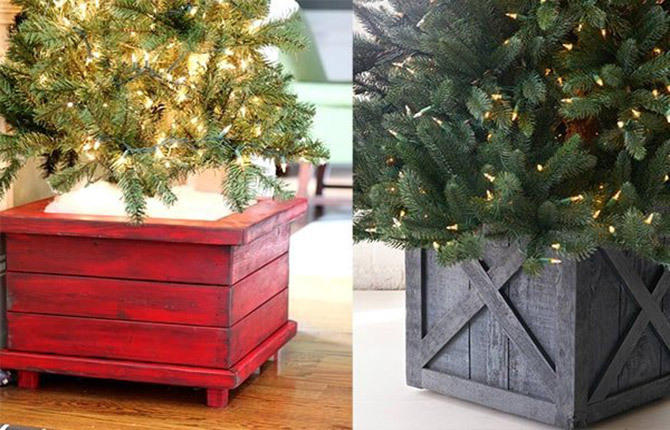
In the form of a wooden box
Many people install a stand with a forest beauty attached to it in a wooden box. The accessory can be purchased at a grocery store. The best option is a container for vegetables. Although, if you have carpentry skills, you can put together a box yourself from wooden slats.
What you will need:
- sheet of plywood measuring 250 x 60 x 2 cm;
- pencil or marker;
- drill 2 mm;
- self-tapping screws 40 mm long;
- PVA construction glue;
- transparent varnish, paints, wide brush;
- circular saw;
- jigsaw or wood saw;
- electric drill or screwdriver.
Before starting to make the box, the following blanks are cut from the furniture panel using a circular saw:
- base - 36 x 36 cm;
- diagonal strips 46 x 4 cm - 8 pcs.;
- horizontal long strips 44 x 5 cm - 4 pcs.;
- horizontal short strips 40 x 5 cm - 4 pcs.;
- vertical strips 30 x 5 cm;
- side panels 40 x 38 cm - 4 pcs.
If you don’t have a circular saw in your house, you can purchase a furniture panel and immediately ask the store employees to cut it into the required pieces. When the necessary parts are prepared, assembly begins.
Manufacturing process:
- Notches are made along the edges of the side panels, 2 cm from the edge. They will become a guide when making the box.
- Now the base is assembled. To do this, holes are drilled in the corners of the “sides” and then fixed with self-tapping screws.
- Next, screw the base (bottom).
- Horizontal and vertical planks are covered with construction PVA, after which they are attached along the perimeter of the walls.
- Using a hacksaw or jigsaw, cut off the edges of the diagonal slats at an angle of 45°.
- They are also “planted” on the side walls using glue.
- Now they adjust the remaining planks, cutting out their middle. The resulting parts are fixed on PVA.
- The finished box is coated with transparent varnish or paint, or, if desired, left in its natural form.
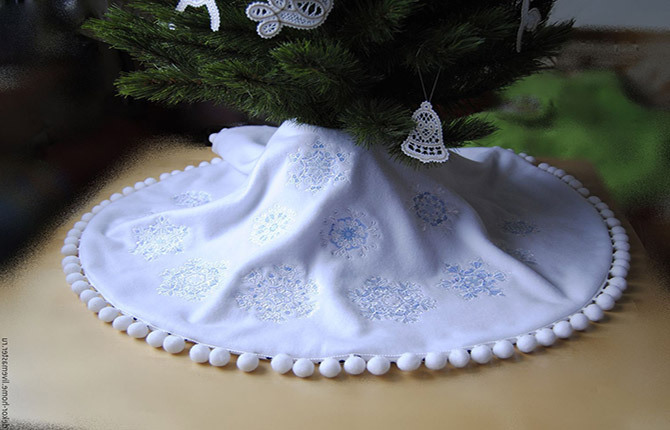
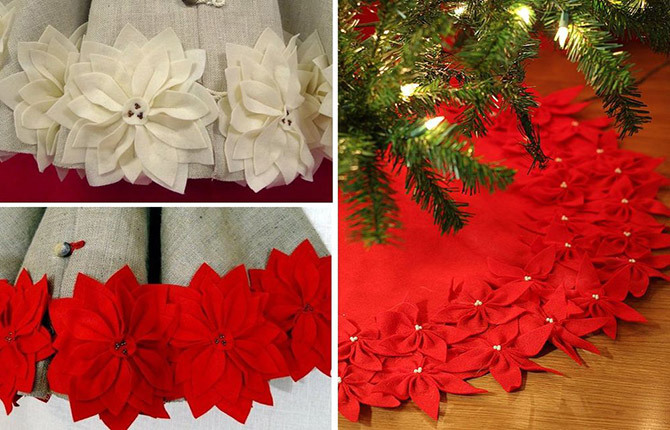
In the form of a “skirt” for the Christmas tree
New Year's decoration of the bottom of the Christmas tree with an elegant skirt will not only improve the space, but also surprise guests with an original solution. And the crumbling needles will give the fabric cape an elegant look.
What you will need:
- scissors;
- tape measure;
- marker or small soap;
- hot glue;
- a piece of felt measuring 150 x 150 cm;
- faux pearl beads;
- needles;
- glue gun;
- threads matched to match or contrasting in color with the shade of the fabric.
Manufacturing process:
- The fabric is folded four times, 35 cm is measured from the center along the folds, marked with a marker or soap, and this segment is cut off along an arc.
- Without unfolding the felt, cut off about 1 cm from the corner so that a small hole appears in the center of the circle.
- A 12 x 4 cm rectangle is cut out of the remaining piece of fabric, the edges are rounded to form a petal. The finished sample is then used as a template for cutting other parts.
- Each three fragments are folded in half and sewn together to form a flower with 6 petals.
- A large bead or pearl is attached to the center using a glue gun.
- The remaining 19 flowers are collected in a similar way - this amount is enough to decorate the top of the “skirt” around the perimeter.
- Glue the flowers onto the felt blank. The location, quantity, size and shape of decorative elements can be different, which is limited only by your imagination.
You can make a stand for the Christmas tree from any available material. And to make it durable, you need to prepare the tool and strictly follow the instructions. The original ideas presented in this article and a little imagination will help make the composition complete.
What kind of tree do you decorate for the New Year: an artificial one or a real one? Write in the comments if you have ever made Christmas tree stands with your own hands and, if so, what materials were used for this. If the article was useful, be sure to save it in your bookmarks, because New Year and Christmas are just around the corner! Don't forget to also share the link via social networks and publish it on thematic discussion platforms. Happy holidays!


